Provisioning Azure infrastructure for deep learning project
In my deep learning efforts, I often find myself wanting to train multiple architectures or test different approaches. Training in parallel is much more time-efficient than doing it sequentially, but buying multiple PCs isn’t a viable option. One solution is to use cloud-provisioned infrastructure. Both Azure and AWS (and other cloud providers as well, though I’m most familiar with these two) offer affordable VMs for deep learning. As of the date of this post, it seems that Azure’s NV6ads_A10_V5 VM size is adequate for the small models I train.
Side note #1: I plan to write a post about provisioning AWS resources as well (AWS was actually my first choice due to slightly lower prices). However, at the time of writing, I don’t have enough vCPU quota there. I requested it, and I’m still waiting for my case to be resolved. Doing the same in Azure took around 4 hours, which was surprisingly fast.
Side note #2: This time the number of building blocks is quite high (for me, who is not a devops) and some of those things I did for the first time; therefore, I decided to explain it in more detail - I do it for myself, so that in the future I can come back and quickly remember the rationale. Moreover, I don’t work with Terraform or provisioning new infrastructures on a daily basis, so I find this kind of elaborate explanations useful for the future me.
Requirements
- Provision a VM on which various deep learning libraries can be installed
- Enable RDP on it (only from my IP)
- Mount Azure blob storage on it
The code
First the providers:
terraform {
  required_providers {
    azurerm = {
      source  = "hashicorp/azurerm"
      version = "~> 4.7.0"
    }
    random = {
      source  = "hashicorp/random"
      version = "~>3.0"
    }
  }
}

provider "azurerm" {
  features {}

  subscription_id = "x-x-x-x-x"
}

provider "http" {}
The random provider will be used for VM RDP password generation. As for the subscription ID - in production code, it shouldn’t be embedded directly like this; instead, it should be passed as a variable during the build process. However, since this project is for personal use only, and I have no plans to set up a formal build process, this approach is good enough.
Resource group creation is straight forward. I choose Poland Central location, because it’s close to where my heart is :)
resource "azurerm_resource_group" "rg" {
  name     = "rg-deeplearning"
  location = "Poland Central"
}
The networking part is a bit more interesting. I needed to restrict traffic so that the machine is only reachable from my PC; that’s why the first two sections retrieve my IP address. The security_rule section then ensures that the standard RDP port is open.
You’ll also notice the small address_prefixes range. It’s kept small because I don’t plan on scaling up to many machines. However, I may want to provision a few more VMs in the future, and these settings give me just enough room to do so.
Each of these resources is required: Azure mandates that all VMs reside within a VNet, with each VNet requiring at least one subnet. The network security group is also necessary to prevent unrestricted access to the VM (and it is locked to my ip as visible in the source_address_prefix value).
data "http" "my_ip" {
  url = "https://checkip.amazonaws.com/"
}

locals {
  my_ip_cidr = "${chomp(data.http.my_ip.response_body)}/32"
}

resource "azurerm_virtual_network" "vnet" {
  name                = "vnet-deeplearning"
  location            = azurerm_resource_group.rg.location
  resource_group_name = azurerm_resource_group.rg.name
  address_space       = ["10.0.0.0/16"]
}

resource "azurerm_subnet" "subnet" {
  name                 = "subnet-deeplearning"
  resource_group_name  = azurerm_resource_group.rg.name
  virtual_network_name = azurerm_virtual_network.vnet.name
  address_prefixes     = ["10.0.0.0/28"]
}

resource "azurerm_network_security_group" "nsg" {
  name                = "nsg-deeplearning"
  location            = azurerm_resource_group.rg.location
  resource_group_name = azurerm_resource_group.rg.name

  security_rule {
    name                       = "Allow-RDP"
    priority                   = 1000
    direction                  = "Inbound"
    access                     = "Allow"
    protocol                   = "Tcp"
    source_port_range          = "*"
    destination_port_range     = "3389"
    source_address_prefix      = local.my_ip_cidr
    destination_address_prefix = "*"
  }
}
The following code snippet defines storage account and blob container - the later will be mounted in the VM.
resource "azurerm_storage_account" "storage_account" {
  name                     = "storageaccountdeeplearn"
  resource_group_name      = azurerm_resource_group.rg.name
  location                 = azurerm_resource_group.rg.location
  account_tier             = "Standard"
  account_replication_type = "LRS"
}

resource "azurerm_storage_container" "blob_container" {
  name                  = "deeplearning"
  storage_account_name  = azurerm_storage_account.storage_account.name
  container_access_type = "private"
}
Now onto the network interface, public IP and the VM definitions:
resource "azurerm_network_interface" "nic" {
  name                = "nic-deeplearning"
  location            = azurerm_resource_group.rg.location
  resource_group_name = azurerm_resource_group.rg.name

  ip_configuration {
    name                          = "internal"
    subnet_id                     = azurerm_subnet.subnet.id
    private_ip_address_allocation = "Dynamic"
    public_ip_address_id          = azurerm_public_ip.public_ip.id
  }
}

resource "azurerm_public_ip" "public_ip" {
  name                = "pip-deeplearning"
  location            = azurerm_resource_group.rg.location
  resource_group_name = azurerm_resource_group.rg.name
  allocation_method   = "Static"
  sku                 = "Standard"
}

resource "random_password" "password" {
  length      = 10
  min_lower   = 1
  min_upper   = 1
  min_numeric = 1
  min_special = 1
  special     = true
}

resource "azurerm_linux_virtual_machine" "vm" {
  name                            = "vm-deeplearning"
  location                        = azurerm_resource_group.rg.location
  resource_group_name             = azurerm_resource_group.rg.name
  network_interface_ids           = [azurerm_network_interface.nic.id]
  size                            = "Standard_NV6ads_A10_v5"
  admin_username                  = "xxx"
  admin_password                  = random_password.password.result
  disable_password_authentication = false
    custom_data = base64encode(templatefile("custom-data.tpl", {
    account_name        = azurerm_storage_account.storage_account.name
    container_name      = azurerm_storage_container.blob_container.name
    storage_account_key = azurerm_storage_account.storage_account.primary_access_key
    user_name           = "xxx"
  }))

  os_disk {
    caching              = "ReadWrite"
    storage_account_type = "Standard_LRS"
  }

  source_image_reference {
    publisher = "Canonical"
    offer     = "ubuntu-24_04-lts"
    sku       = "server"
    version   = "latest"
  }

  identity {
    type = "SystemAssigned"
  }
}

resource "azurerm_network_interface_security_group_association" "nsg_association" {
  network_interface_id      = azurerm_network_interface.nic.id
  network_security_group_id = azurerm_network_security_group.nsg.id
}

resource "azurerm_role_assignment" "blob_access" {
  principal_id         = azurerm_linux_virtual_machine.vm.identity[0].principal_id
  role_definition_name = "Storage Blob Data Contributor"
  scope                = azurerm_storage_account.storage_account.id
}
Starting from the top: the network interface is necessary for the VM to communicate with the internet; without it, package installations would not be possible. The next definition is for the public IP, which enables the VM to access external resources for software installation and allows me to RDP into the VM.
The VM definition contains two key points of interest: the identity block and the custom_data block. The SystemAssigned identity means that the VM can securely access other Azure resources, like blob storage, without needing explicit credentials. This identity is managed by Azure and will be automatically provisioned and decommissioned as needed, as described in this tutorial.
As for the custom_data block, it contains a shell script to be run upon VM start. It will install software necessary for my further work (like RDP). It will also mount blob storage volume into the VM using a tool called blobfuse2.
Side note #3: As for the source_image_reference block, I took the value from here.
#!/bin/bash
sudo wget https://packages.microsoft.com/config/ubuntu/24.04/packages-microsoft-prod.deb
sudo dpkg -i packages-microsoft-prod.deb
sudo apt-get update -y
sudo apt-get install -y ubuntu-desktop xrdp libfuse3-dev fuse3 blobfuse2 python3-pip python3-venv

systemctl enable xrdp
systemctl start xrdp
ssh-keygen -t rsa -b 4096 -f $HOME/.ssh/id_rsa -N ""

sudo mkdir /mnt/resource/blobfuse2tmp -p
sudo chown ${user_name} /mnt/resource/blobfuse2tmp
mkdir $HOME/deeplearning
mkdir $HOME/fusecache
yaml_file="$HOME/blobfuse_config.yml"

cat <<EOF > "$yaml_file"
logging:
  type: syslog
  level: log_debug

components:
  - libfuse
  - file_cache
  - attr_cache
  - azstorage

libfuse:
  attribute-expiration-sec: 120
  entry-expiration-sec: 120
  negative-entry-expiration-sec: 240

file_cache:
  path: $HOME/fusecache
  timeout-sec: 120
  max-size-mb: 4096

attr_cache:
  timeout-sec: 7200

azstorage:
  type: block
  account-name: ${account_name}
  account-key: ${storage_account_key}
  endpoint: https://${account_name}.blob.core.windows.net
  mode: key
  container: ${container_name}
EOF
sudo blobfuse2 mount $HOME/deeplearning --config-file="$HOME/blobfuse_config.yml"

pip3 install --upgrade pip
pip3 install opencv-python-headless matplotlib numpy torch torchvision tqdm jupyter
mkdir -p $HOME/jupyter_notebooks
sudo chown -R ${user_name} $HOME/jupyter_notebooks/
jupyter notebook --generate-config -y
echo "c.NotebookApp.ip = '0.0.0.0'" >> $HOME/.jupyter/jupyter_notebook_config.py
echo "c.NotebookApp.open_browser = False" >> $HOME/.jupyter/jupyter_notebook_config.py
echo "c.NotebookApp.notebook_dir = '$HOME/jupyter_notebooks'" >> $HOME/.jupyter/jupyter_notebook_config.py
echo "c.NotebookApp.allow_root = True" >> $HOME/.jupyter/jupyter_notebook_config.py
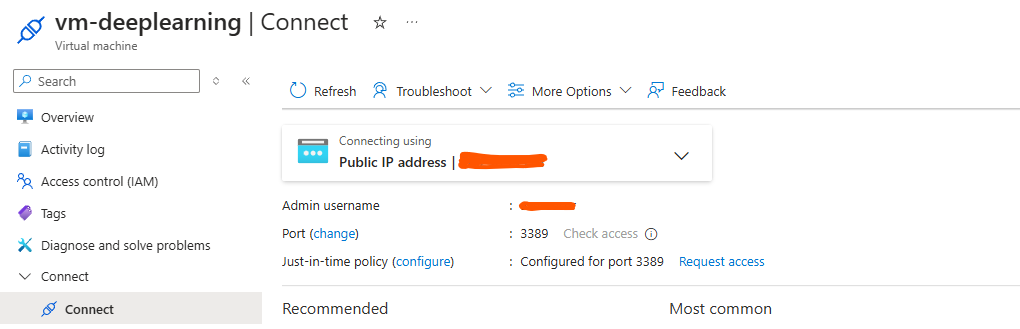
It looks like a complete solution, but unfortunately, it’s not. To be able to RDP into the machine, I had to perform one more manual step - enabling Just-In-Time (JIT) access. This cannot be configured via Terraform and has to be enabled on the following screen:
Conclusions
Provisioning this infrastructure was suprisingly easy and quick. I regret I wasn’t able to do the same on AWS, but hopefully after their customer support bumps my vcpu quota, I’ll be able to do it (and describe it in another blog post).